
前言
微信抢红包、修改定位、语音转发,很火,自己足不出户可以走遍天下,这很酷。最近研究了iOS的hook技术,发现门道不少,特意写个纪实blog,本文非教程,本文以微信为例,部分内容可能看不懂。
下载APP
对于App Store的应用
App Store中的应用都加密过,直接用是不行的,有两种方法:
- 如果通过PP助手下载的app,直接将XXX.app通过iFunBox提取到mac上,直接提供class-dump使用。
- 越狱后的App目录在/var/mobile/Applications/xxxxxx/ 下,通过iFunBox可以直接把dumpdecrypted.dylib文件放到Documents下,用命令砸壳,用到的砸壳工具就是dumpdecrypted
最后得到最终的ipa文件
Safari里安装的企业应用
在电脑上,打开企业提供的网址,找到iOS安装入口,点击下载,会自动下载一个.plist文件,打开如下:
<plist version="1.0">
<dict>
<key>items</key>
<array>
<dict>
<key>assets</key>
<array>
<dict>
<key>kind</key>
<string>software-package</string>
<key>url</key>
<string>https://**/下载地址/</string>
</dict>
<dict>
<key>kind</key>
<string>display-image</string>
<key>url</key>
<string>https://**/ios-icon/</string>
</dict>
</array>
<key>metadata</key>
<dict>
<key>bundle-identifier</key>
<string>xxx.xxx.com</string>
<key>bundle-version</key>
<string>1.0.0</string>
<key>kind</key>
<string>software</string>
<key>title</key>
<string>软件名字</string>
</dict>
</dict>
</array>
</dict>
</plist>
找到software-package中的url值,复制到浏览器,会自动请求服务器,下载一个带有企业签名的ipa文件。
确认是否脱壳解密
把ipa文件后缀改成zip,然后解压,会看到.app文件
file /Users/ivan/Desktop/Payload/xxx.app/xxx
/Users/ivan/Desktop/Payload/xxx.app/xxx: Mach-O universal binary with 2 architectures: [arm_v7:Mach-O executable arm_v7] [arm64]
/Users/ivan/Desktop/Payload/xxx.app/xxx (for architecture armv7):	Mach-O executable arm_v7
/Users/ivan/Desktop/Payload/xxx.app/xxx (for architecture arm64):	Mach-O 64-bit executable arm64
可见,xxx包含armv7和arm64两个版本。
otool可以输出app的load commands,然后通过查看cryptid这个标志位来判断app是否被加密。1代表加密了,0代表被解密了:
otool -l /Users/ivan/Desktop/Payload/xxx.app/xxx   | grep -B 2 crypt
          cmd LC_ENCRYPTION_INFO
      cmdsize 20
     cryptoff 16384
    cryptsize 4161536
      cryptid 0
--
          cmd LC_ENCRYPTION_INFO_64
      cmdsize 24
     cryptoff 16384
    cryptsize 4866048
      cryptid 0
可见,xxx为0状态,企业级app不在app stroe上发布,没有被加密。
测试重新签名
重新签名打包
GitHub上的Urinx大佬为我们准备了一键化的重新签名工具Appsign,非常好用,下载地址:
https://github.com/Urinx/iOSAppHook/releases
下载后,测试能否重新签名,因为我们的最终目的是将程序重新打包签名,将带有tweak的程序安装到手机上,这一步骤至关重要。
赋予执行权限
chomd +x /Users/ivan/Downloads/AppResign
执行命令,按照AppResign的要求,命令为AppResign input output
/Users/ivan/Downloads/AppResign  /Users/ivan/Desktop/要被签名的文件.ipa  /Users/ivan/Desktop/output/输出的文件xxx.ipa
=============================
[*] Configure Resigning
Choose Signing Ceritificate:
[0] iPhone Developer: [email protected] (3N2H*****3)
[1] *****
[2] iPhone Developer: [email protected] (4*****6T9C)
> 2
Use Certificate: iPhone Developer: [email protected] (4*****6T9C)

Choose Provisioning Profile:
[0] iOS Team Provisioning Profile: cc.caver.SimulateLocation (KHER5U9877)
Use Profile: iOS Team Provisioning Profile: cc.caver.SimulateLocation (KHER5U9877)
Position: /Users/ivan/Library/MobileDevice/Provisioning Profiles/xxxx-ec15-xxxx-bf8d-xxxx.mobileprovision

Use default bundle ID: cc.caver.SimulateLocation

Set App Display Name: pojieapp
Delete url schemes (y/n): n
=============================
[*] Start Resigning App
Extracting ipa file
Copying provisioning profile to app bundle
Parsing entitlements
Changing App ID to cc.caver.SimulateLocation
Changing Display Name to yuanqu
Codesigning /xxx.app with entitlements
Packaging IPA
Done, output at /Users/ivan/Desktop/output/输出的文件xxx.ipa
安装测试
打开Xcode,点击Window,点击Devices and Simulators
看到如下界面,点击加号,添加刚刚output出的ipa,稍等片刻,安装到手机。
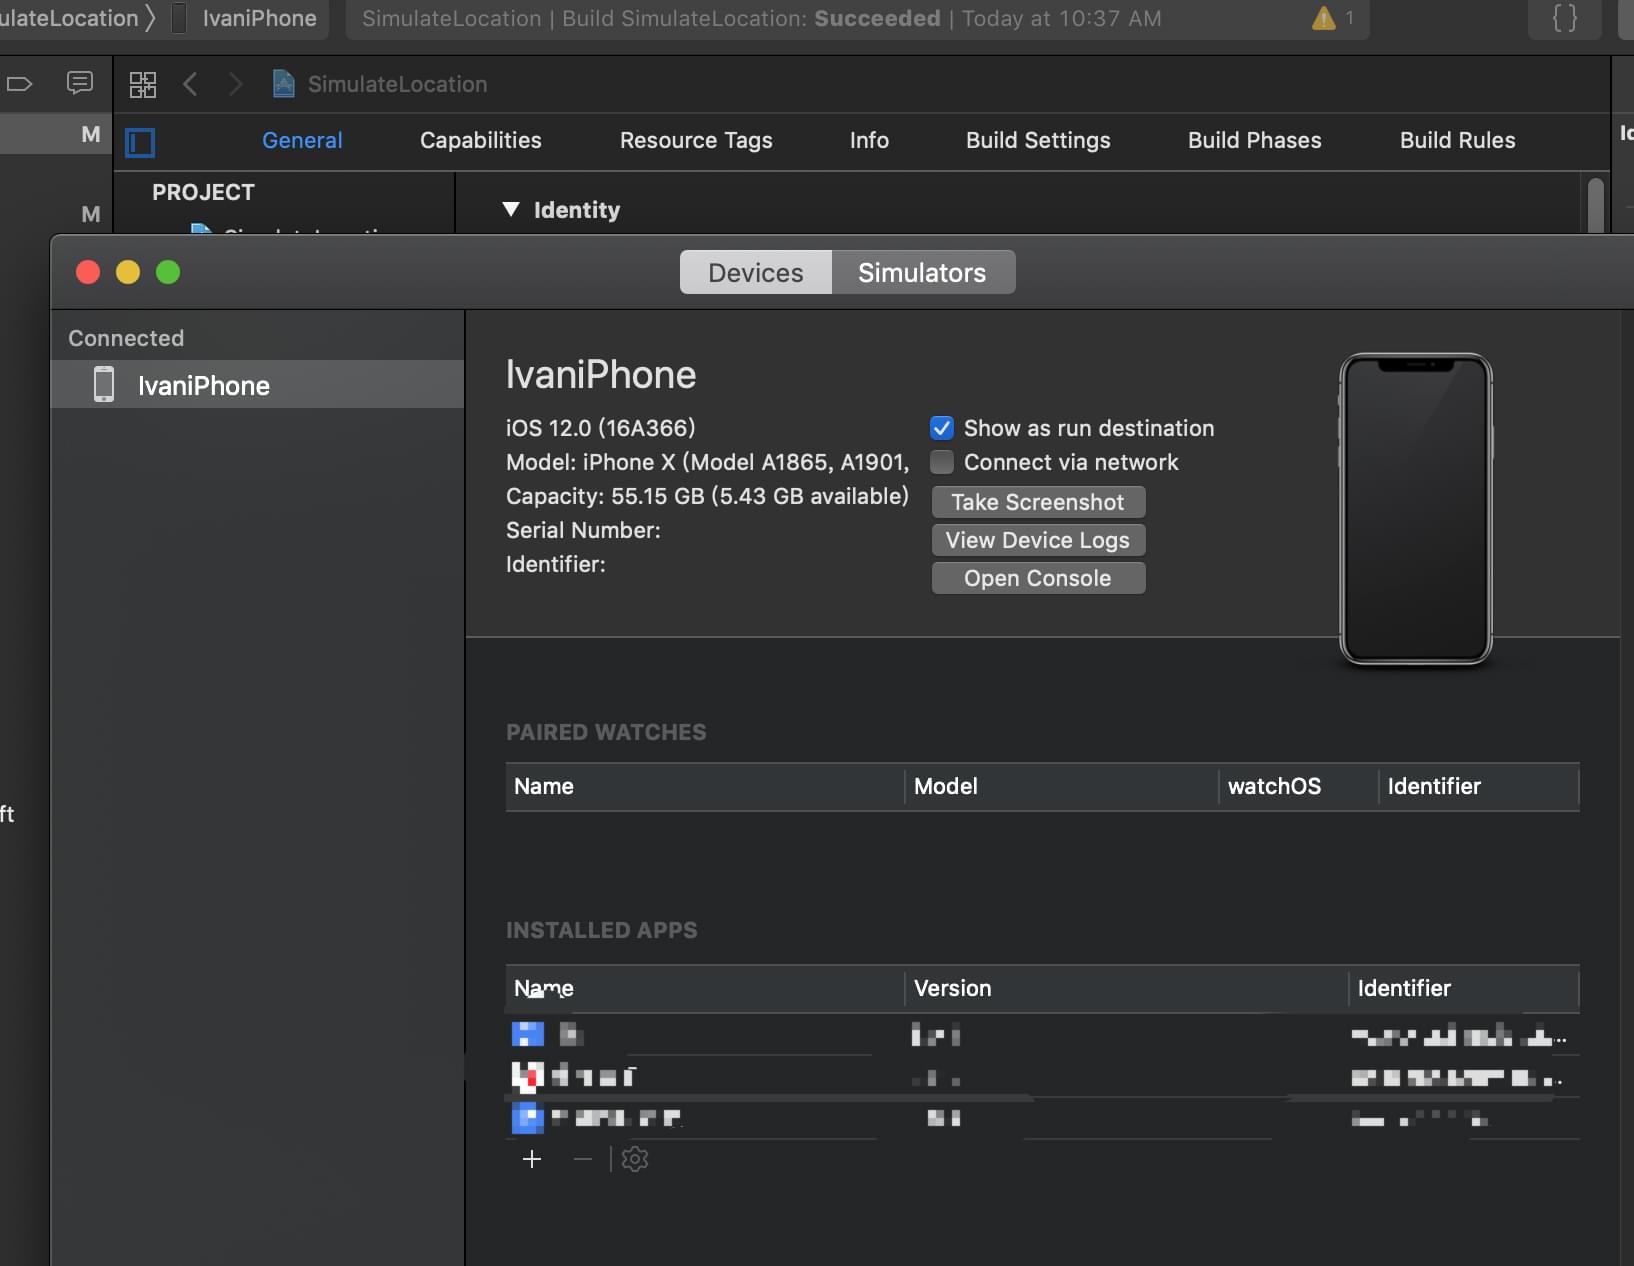
信任证书后,如果能成功安装并且打开,说明没毛病。
安装Theos
安装 iOS SDK
xcode-select --install
环境变量
echo "export THEOS=~/theos" >> ~/.profile
下载Theos
git clone --recursive https://github.com/theos/theos.git $THEOS
安装ldid
brew install ldid
安装ghostbin
curl https://ghostbin.com/ghost.sh -o $THEOS/bin/ghost
chmod +x $THEOS/bin/ghost
编写Hook
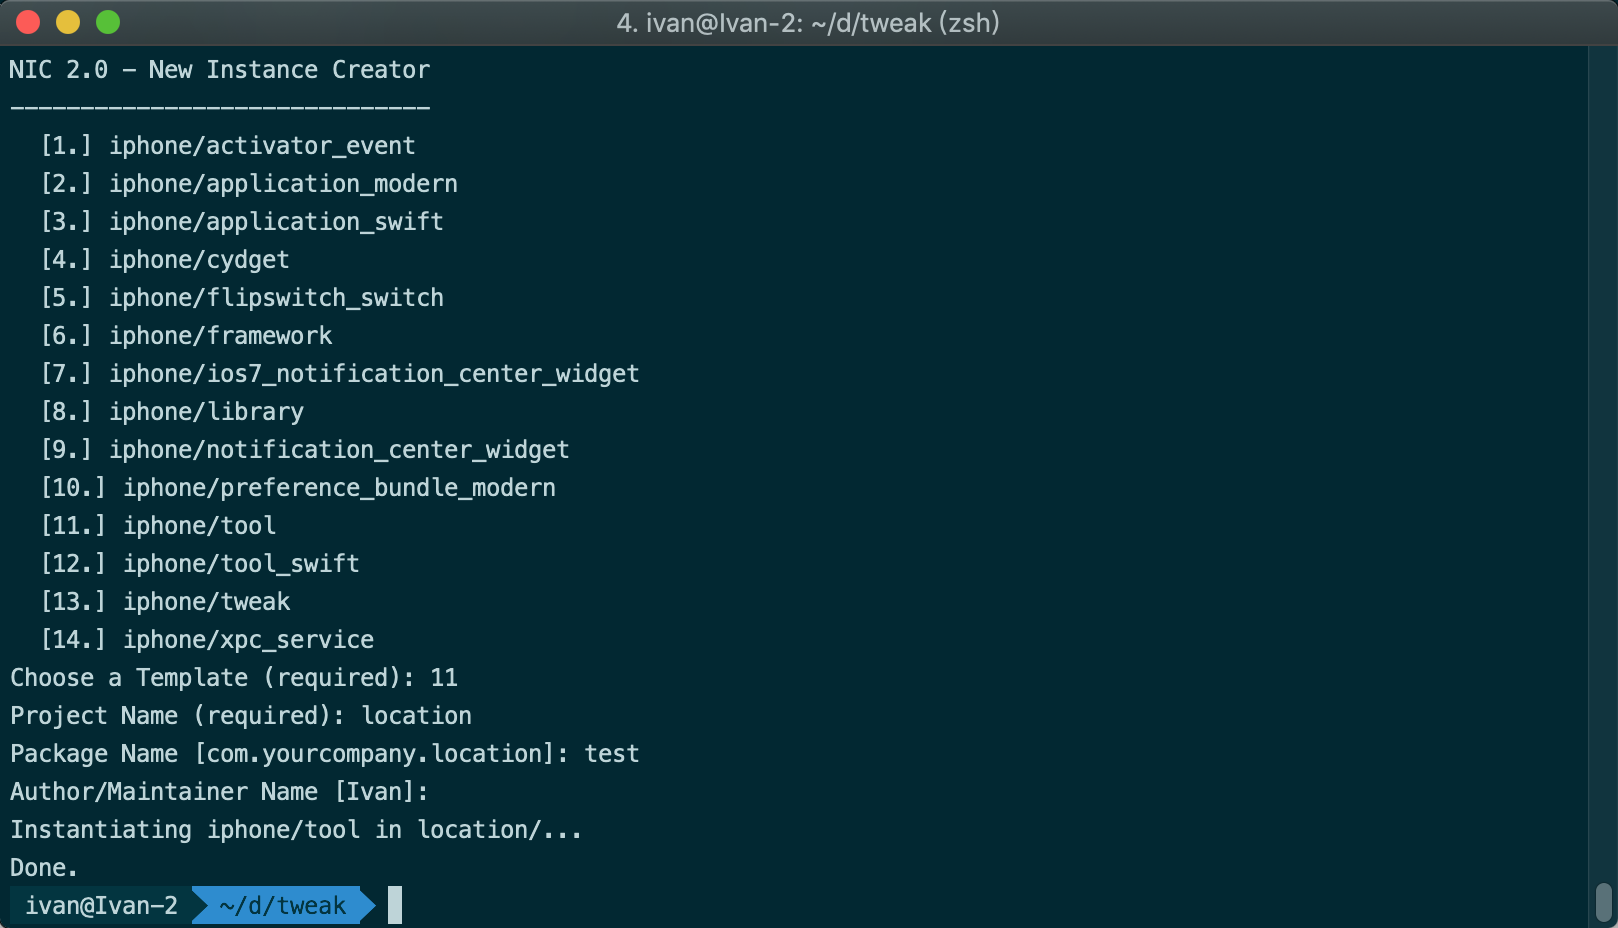
创建Tweak
在命令中输入 nic.pl选13,后面内容自行填写
分析
-(void)locationManager:(CLLocationManager *)manager didUpdateLocations:(NSArray *)locations {
    CLLocation *newLocation = locations[0];
    CLLocationCoordinate2D coordinate = newLocation.coordinate;
}
我们试着实现
通过引用LocationTracker框架后,开始获取位置后,便会通过locationManager这个代理来回调,并通过 CLLocationCoordinate2D coordinate = newLocation.coordinate. 这句来获取到位置信息. 明白原理就简单了,接下来我们只需要在app内部hook到CLLocation的coordinate,并返回我们想要的地理位置就可以啦,源代码如下:
实现
代码
location.plist
{ Filter = { Bundles = ( "com.caver.SimulateLocation" ); }; }
Tweak.xm
#import <CoreLocation/CoreLocation.h>

%hook locationManager
-(CLLocationCoordinate2D) coordinate{
  CLLocationCoordinate2D oldCoordinate = %orig;
  oldCoordinate.latitude = 39.0010750000;
  oldCoordinate.longitude = 116.0096720000;
  return oldCoordinate;
}
%end
编译
在目录下执行make,将编译好的复制到本层目录
cd project/location
make
cp .theos/obj/debug/location.dylib ./
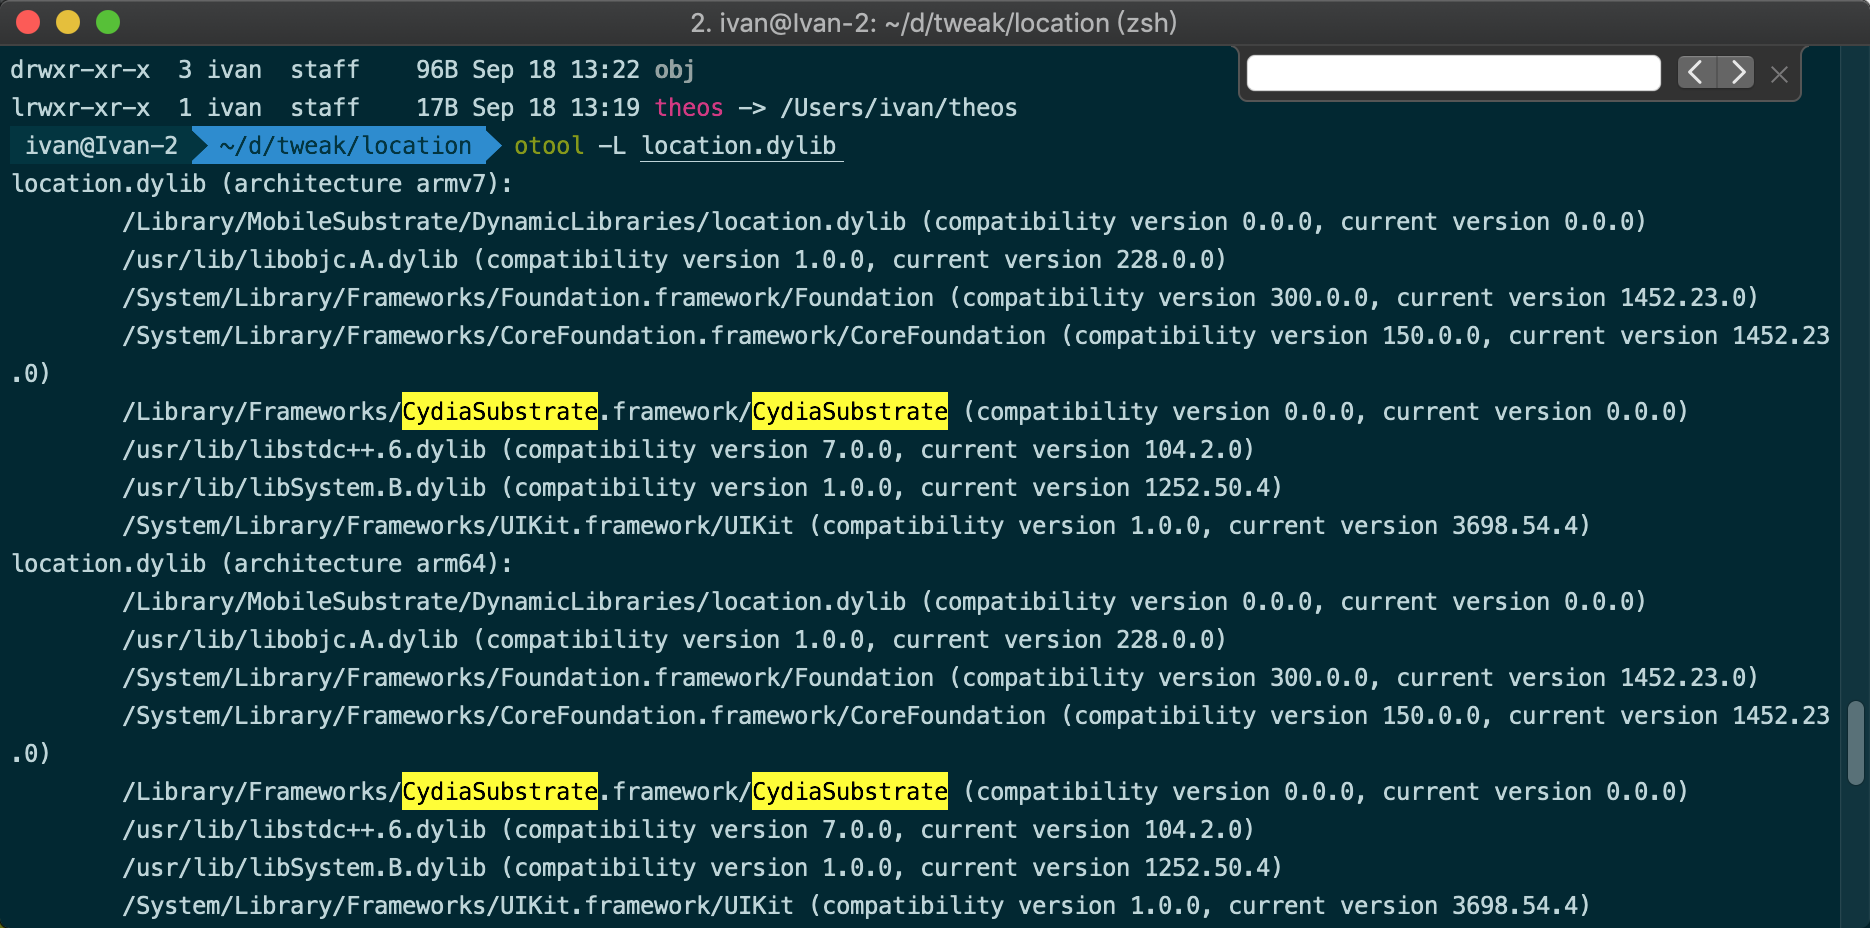
检查依赖
otool -L location.dylib
location.dylib (architecture armv7):
	/Library/MobileSubstrate/DynamicLibraries/location.dylib (compatibility version 0.0.0, current version 0.0.0)
	/usr/lib/libobjc.A.dylib (compatibility version 1.0.0, current version 228.0.0)
	/System/Library/Frameworks/Foundation.framework/Foundation (compatibility version 300.0.0, current version 1452.23.0)
	/System/Library/Frameworks/CoreFoundation.framework/CoreFoundation (compatibility version 150.0.0, current version 1452.23.0)
	/Library/Frameworks/CydiaSubstrate.framework/CydiaSubstrate (compatibility version 0.0.0, current version 0.0.0)
	/usr/lib/libstdc++.6.dylib (compatibility version 7.0.0, current version 104.2.0)
	/usr/lib/libSystem.B.dylib (compatibility version 1.0.0, current version 1252.50.4)
location.dylib (architecture arm64):
	/Library/MobileSubstrate/DynamicLibraries/location.dylib (compatibility version 0.0.0, current version 0.0.0)
	/usr/lib/libobjc.A.dylib (compatibility version 1.0.0, current version 228.0.0)
	/System/Library/Frameworks/Foundation.framework/Foundation (compatibility version 300.0.0, current version 1452.23.0)
	/System/Library/Frameworks/CoreFoundation.framework/CoreFoundation (compatibility version 150.0.0, current version 1452.23.0)
	/Library/Frameworks/CydiaSubstrate.framework/CydiaSubstrate (compatibility version 0.0.0, current version 0.0.0)
	/usr/lib/libstdc++.6.dylib (compatibility version 7.0.0, current version 104.2.0)
	/usr/lib/libSystem.B.dylib (compatibility version 1.0.0, current version 1252.50.4)
解决不存在的依赖
因为MobileSubstrate是越狱后才有的,必须在注入前替换掉这个库,相应的,libsubstrate.dylib下载地址:
https://pan.baidu.com/s/1o8PPVGu
install_name_tool -change /Library/Frameworks/CydiaSubstrate.framework/CydiaSubstrate @loader_path/libsubstrate.dylib location.dylib
再次用otool检查,没有MobileSubstrate后可以继续下一步
重新签名dylib
在钥匙串访问中能找到一个名为 Developer ID Application: Your Company Name 的证书。
codesign -f -s 'iPhone Developer: [email protected] (4*****6T9C)' libsubstrate.dylib
libsubstrate.dylib: replacing existing signature
动态库注入
动态库的注入,可以使用这个工具 insert_dylib脚本.
insert_dylib --all-yes @executable_path/test.dylib Payload/WeChat.app/WeChat
@executable_path/test.dylib 表示动态库的加载路径,@executable_path 表示可执行文件所在的路径, 所以我们要把动态库放到可执行文件一级的目录.
git clone http://www.github.com/Tyilo/insert_dylib
然后在xcode中运行,提取Products中的insert_dylib二进制文件
/Users/ivan/d/tweak/insert_dylib  --all-yes /Users/ivan/d/tweak/location/.theos/obj/debug/location.dylib  /Users/ivan/Desktop/Payload/xxx.app/xxx
Binary is a fat binary with 2 archs.
LC_CODE_SIGNATURE load command found. Remove it? [y/n] y
LC_CODE_SIGNATURE load command found. Remove it? [y/n] y
Added LC_LOAD_DYLIB to all archs in /Users/ivan/Desktop/Payload/xxx.app/xxx_patched
修改xxx_patched名字为xxx,将刚刚生成的两个dylib复制到目录里。
安装APP
过程同测试重新签名,内容为纪实,仅供测试与学习过程。
参考
https://github.com/Urinx/iOSAppHook